Graduated Blurs
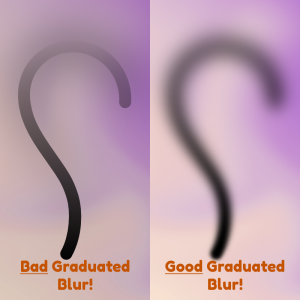 We want to blur an image gradually from bottom to top.
The quick and cheesy way entails a pristine image, its blurred counterpart and a mask that splices the two together in a compositing operation. This is the kind of “graduated blur” that new Gimp or Photoshop users get when they use a heavily feathered (i.e., blurred) selection mask, with the hope that the mask will gradually “strengthen” the blur from the unselected to selected regions.
Nothing of the sort happens. Instead, the paint program takes the fully blurred "A" and the pristine "B" and does the classic Porter and Duff A over B compositing operation through the selection. Examine the results and find the sharp edges of the original somewhat masked by its fully blurred counterpart. There is no “graduated blur”, just A over B. Cheesy.
ImageMagick has a far better transitional blur in its compositing engine (-compose blur ... -composite). The channels of an RGB control mask dynamically shape a convolution kernel3. Ramp-like masks can “grow” the kernel dynamically, pixel-by-pixel, for very high quality transitions. It can make enchantingly beautiful effects but is slow, as is anything that reshapes convolution kernels on the fly.
For G'MIC, smooth furnishes a similar service. Here, a tensor field takes the role of ImageMagick's control mask. This facet of the -smooth command is often overlooked, given its strong association with anisotropic smoothing. One might be inclined to think that anisotropic smoothing is “all” that -smooth does. In fact it is a general purpose blurring engine which can shape a kernel on the fly, given the pixel-by-pixel instructions furnished by a tensor field. The key to this very general and very accommodating engine entails giving -smooth a separately prepared tensor field, which it accepts by way of a command line image selector.
Our game, then, is to prepare a tensor field. That task boils down to using eigen2tensor, which converts pairs of two channel images into tensor fields. These associate a pair of vectors with each operand pixel; these vectors then direct the size, eccentricity and orientation of a blurring kernel in the locale of the operating pixel.
The care and feeding of eigen2tensor entails preparing four gray scale control images by various and sundry means. We call them EigenOne, EigenTwo, Cosine and Sine. Don't worry too much about these names. They're labels for now, nothing more. We pairwise -append these grayscale images together to make the input eigen2tensor requires.
Here's the nuts-and-bolts of a graduated blur using smooth and tensor fields.
$ gmic input images/Kleine_Houtstraat.png
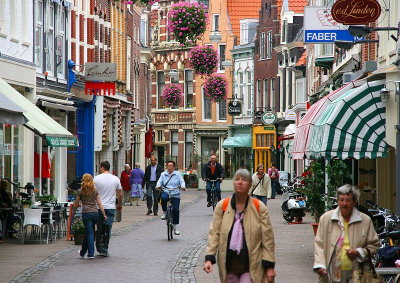 | Kleine Houtstraat in Haarlem, Netherlands by Marek Ślusarczyk, Wikimedia Commons. Nothing much in the opening bit. We used input to grab a nice image out of Wikimedia Commons. This is our operand image. |
100%,100%,1,1,'h-y' \
-normalize[-1] 0,1 \
'(0^0^1)' \
-resize[-1] [-3],[-3],[-1],[-1],1 \
-split[-1] c \
-normalize[-1] 0,1 \
'(0^0^1)' \
-resize[-1] [-3],[-3],[-1],[-1],1 \
-split[-1] c \
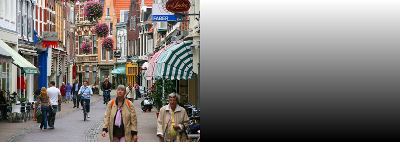 |  |
We conjure from the aether:
| 1. | EigenOne, a ramp normalized to run from 1 to zero |
| 2. | EigenTwo, a constant value image, set to zero |
| 3. | Cosine, a constant value image, set to zero |
| 4. | Sine, a constant value image, set to one |
(0^0^1) may look mysterious to some of you. It conjures out of the aether a one pixel by one pixel image with three channels. We resize these to match the input image dimensions and then split them apart to make items 2.– 4. See "Image Streams", a part of the input command.
-append[-4,-3] c \
-append[-2,-1] c \
-append[-2,-1] c \
 |  |
We append together EigenOne and EigenTwo along the channel dimension; ditto Cosine and Sine. This gives us two datasets, each with a pair of channels. The first dataset, which -display renders in red, contains vector lengths. The lengths are zero or nearly so at the bottom, but grow toward one at the top. The second dataset, which -display renders in green, contains normalized directions. The second data set associates a constant direction, pointing straight up, to each pixel, hence the uniform color.
-eigen2tensor[-2,-1] \

With eigen2tensor. we make a tensor field from the magnitude and direction datasets. These tell smooth how to blur pixel-by-pixel. Don't let the name tensor field alarm you; it's just a name, same as any other. Nor eigen. It's German. Google it.
-repeat 3 -smooth[-2] [-1],50 -done \
-rm[-1]
-rm[-1]
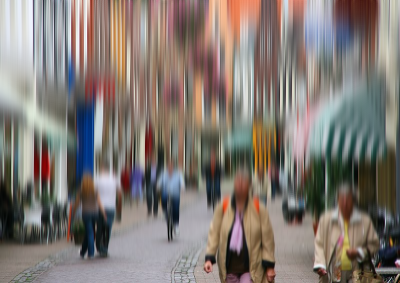
We kick off three passes of smooth and delete the tensor field. We're done.
Here's a bit what smooth did. The tensor field instructs smooth how to blur the input pixels on a pixel-by-pixel basis. For each pixel in the street image, there's a corresponding tensor telling smooth how much to blur the pixel and in what direction. In this case, you can probably intuit the overall nature of these instructions. The ramp we started out with set up a tensor field so that pixels near the bottom got blurred vertically, but by only a little bit, while pixels on top got blurred a lot.
OK. Graduated blur. Nothing special. But the important takeaway is this: We Decoupled Smooth From Anisotropic Smoothing. If you remember nothing else about this Recipe, let it be this:
" smooth is a general purpose, pixel-by-pixel smoothing tool."
Sleep on that. Meditate. It's aim is similar to ImageMagick's blur compositor. Both custom smooth each and every pixel and you can vary that across the lot. That is very, very powerful. It is a graduated blur arising from a dynamically shaped convolution kernel. You can fake depth-of-field, Grow hair — go for weeks experimenting with it. Maybe even months. Or years. Lifetimes, even.
The key to mastering G'MIC's version is learning how to set up four gray scale images: EigenOne, EigenTwo, Cosine, Sine. eigen2tensor does the grunt work of making them into tensor fields. You can put almost anything you want in those gray scale images. Really. David says it's OK. Just keep EigenOne, EigenTwo and Sine normalized between zero and one, and Cosine between negative and positive one — the trig functions' ranges between
![[0,\dots\pi]](img/_0_dots_pi_.png) . Otherwise smooth runs all night and the better part of the next day. You don't want that.
. Otherwise smooth runs all night and the better part of the next day. You don't want that.

 Home
Home Download
 News
News Mastodon
 Bluesky
 X
X Summary - 17 Years
 Summary - 16 Years
 Summary - 15 Years
 Summary - 13 Years
 Summary - 11 Years
 Summary - 10 Years
 Resources
 Technical Reference
 Scripting Tutorial
 Video Tutorials
 Wiki Pages
 Image Gallery
 Color Presets
 Using libgmic
 G'MIC Online
 Community
 Discussion Forum (Pixls.us)
 GimpChat
 IRC
IRC Report Issue