norm
theatre_moliere.png
Color, luminance and norm.
The norm command regards the channel values of a pixel as components of a vector; it replaces the pixel with a single-channel value, the Euclidean length of that vector. See orientation for the general discussion on RGB color spaces, including the treatment of a color as a position vector in that space.
Luminance, Norm and Orientation: What is the Story?
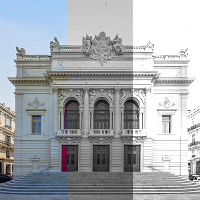
In the RGB color space framework, norm is complementary to orientation. If it is one's wont to regard an image as consisting of color vectors, then norm extracts the length of those vectors and orientation extracts their direction. norm is rarely an end in itself; it is an intermediary command that builds a dataset of vector lengths, generally to support further calculations.Visually, norm is often thought to be a kind of luminance command, as its results are superficially like it. luminance, however, is intended to give displayable results. norm couldn't care less about displayable results; it reports on vector lengths, however they may fall. These will often exceed the upper limit of the 8 bit intensity range (0,255) of graphic formats. The image on the left of Théâtre Molière, Sète, Hérault compares original color, luminance (middle) and norm (right). Since some pixels exceeded 255 in the right hand section, the highlights are flat and the overall results are washed out. Take away: norm is not your luminance command.
Example: Key Color
The commands norm and orientation taken together are image decomposition commands in the vein of -rgb2***. -split. c leaving on the image list a set of single channel images that contain various image properties. For example, rgb2hsl reorganizes the image into hue, saturation and lumination channels. Get those, then play tricks.The commands norm and orientation furnish a kind of decomposition that is congenial for those who think of colors as vectors, their luminance is comparable to their length: norm extracts those lengths, so that command is "luminance-like." It generates single channel images containing the vector length of each pixel in the source image. orientation extracts where pixels' colors are pointing - their orientation - so that command is is "color-like." It generates three channel images containing the red, green and blue components of a color. These "color" vectors all have lengths of one. Executing a norm command on the output of orientation produces a single channel image where all pels are equal to 1. There are faster ways to make such an image.
One application that harnesses both these commands is popping a key color: Part of an image with a designated hue has unaffected saturation. Other colors, not so much like the key, are considerably less saturated. Complementary colors of the key aren't saturated at all. You have probably seen this in a bazillion places; it was popular a dozen years ago and now has become somewhat cliché.
For those who think vectorially, dot and cross products suggest themselves as solutions to popping the key.
| Colorwheel | Dotting with the red vector |
 | 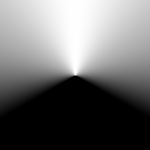 |
The dot product of two unit vectors is a scalar and is equal to the cosine between them.
The dot of parallel unit vectors is one;
the dot of right-angled unit vectors is zero;
the dot of unit vectors pointing in opposite directions is negative one.
The dot of a color vector with the key color vector therefore furnishes a scalar that tells us how "like" a color vector is with a given key color.| Colorwheel | Crossing with the red vector |
 |  |
The cross product of two unit vectors is a new vector perpendicular to the two unit vectors; the length of the new vector is equal to the area of the parallelogram formed by the unit vectors.
The cross of parallel unit vectors is a zero length vector;
the cross of right-angled unit vectors is a unit length vector;
the cross of unit vectors pointing in opposite directions is zero.
Signed areas are admissable, but try explaining negative area to an eight year old. Positive area arises from considering counterclockwise rotation, negative from clockwise rotation, where one of the vectors is taken to be the reference for clockwise or counterclockwise rotation.
Either dot or crossing works, but with differences. Being an operation that generates areas (square relationships) the cross product rises from zero at a steeper slope than the dot product drops from one. The cross product excludes off-colors more readily than the dot product. Choice rides on the aesthetics of drop-off.
The example here uses the sharper cross product.
gmic \
-sample rooster,300 \
+orientation. \
+fill. 'cross(I,[0.935,0.235,0.265])' \
-norm. \
-normalize. 0,1 \
-fill.. "whitevect=[1,1,1]/norm([1,1,1]); \
lerp(I,whitevect,i#-1)" \
-fill.. 'I/norm(I)' \
-rm. \
+norm[0] \
-mul[-2,-1] \
-output. rooster_keyred.png
-sample rooster,300 \
+orientation. \
+fill. 'cross(I,[0.935,0.235,0.265])' \
-norm. \
-normalize. 0,1 \
-fill.. "whitevect=[1,1,1]/norm([1,1,1]); \
lerp(I,whitevect,i#-1)" \
-fill.. 'I/norm(I)' \
-rm. \
+norm[0] \
-mul[-2,-1] \
-output. rooster_keyred.png
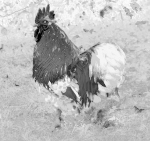
| A rooster | color vectors | cross products | normed crosses |
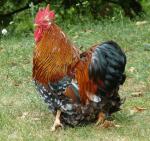 | 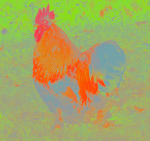 | 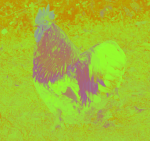 |  |
We duplicate the unit vector image (color vectors) and harness +fill to host a single math expression statement: cross(I,[0.935,0.235,0.265]). As is its wont, the fill command traverses the color vector image and, executing its one-line math expression for each pixel, fills the new image with the cross product of the original color vectors and the key color (cross products) from the rooster's comb.
We have the cross product vectors. What we really want are their lengths, for the short ones - the ones that are zero or very nearly so - correspond to pixels that are exactly or nearly exactly the comb color. We harness norm -- remember norm? norm is the subject of this tutorial, lest we forget -- we harness norm to convert these cross vectors to their lengths (normed crosses). This is our key dataset. We harness this dataset in the next section.
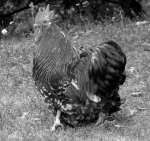
| A rooster | desat color vectors | normed rooster |
 | 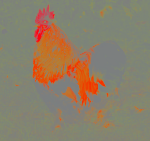 |  |

The lefthand side represents the color vectors that are desaturated for almost every hue but for the rooster's comb, which remains a bright red. These desat color vectors are what we are going to use instead of color vectors from A rooster. We get them by "lerping" between the original color vectors and a single vector, W the "white vector" By "lerping" we mean making simple linear combinations between our original color vectors and the white vector. Put simply, we perform a pixel-by-pixel blend between the white vector and the original color vector inhabiting the pixel. The normed cross factor for the pixel - t in the equation - determines how much of the white vector is part of the blend. For large values of t, the white vector prevails, and the pixel is largely or wholly desaturated. for zero or tiny t values, the pixel is mainly the unblended original pixel. But those are the ones that are the key color, or very nearly so. The only saturated colors to be seen are rooster comb colors.
What is the "white vector"? It is the unit length vector with all of its R, G and B components equal to one another. It represents - no surprise here - white. Perforce, as a unit length vector, each R, G and B component equals the reciprocal of the square root of three, about 0.57735, because the square root of the squared sums of these components equals one. In math expression scripting, [1,1,1]/norm([1,1,1]) generates the white vector.
The G'MIC expression implementing the lerp is performed by the second -fill.. whitevect=[1,1,1]/norm([1,1,1]);lerp(I, whitevect,i#-1) That fill operation replaces the contents of color vectors with desat color vectors. The third fill.. ensures that these blended color vectors are at unit length. Taking a lerp is a bit of a cheat: the blended vectors trace a chord of the unit vector sphere, not its surface, so some fall short of unity. Purists would insist on a higher order blending function; such would be hard to distinguish from our cheat, which is much simpler to implement.
And, we're done. All that remains is cleanup and housekeeping. We remove normed crosses from the pipeline; we don't need them anymore. We get a fresh set of normed lengths of the original rooster image and multiply those with desat color vectors to get our resulting image.
![sample rooster,300 +orientation. +fill. cross(I,[0.935,0.235,0.265]) -norm. -normalize. 0,1 -fill.. whitevect=[1,1,1]/norm([1,1,1]);lerp(I,whitevect,i#-1) -fill.. I/norm(I) -rm. +norm[0] -mul[-2,-1]](img/sample_rooster_300_orientation_fill_cross_I_0_935_0_235_0_265_norm_normalize_0_1_fill_whitevect_1_1_1_norm_1_1_1_lerp_I_whitevect_i_1_fill_I_norm_I_rm_norm_0_mul_2_1_.png)
Postscript
gmic \
-sample rooster,300 \
+orientation. \
+fill. 'cross(I,[0.935,0.235,0.265])' \
-norm. \
-normalize. 0,1 \
+fill. '1/norm([1,1,1])' \
-to_rgb. \
-image... [-1],0,0,0,0,1,[-2] \
-rm[-2,-1] \
+norm[0] \
-mul[-2,-1] \
-output. rooster_keyred_2.png
For those who don't have a complete feel for math expressions yet, here is an "image compositor's approach". In this approach, normed crosses control the blending between a sprite image - a monocolor image filled entirely with the reciprocal of the square root of three, and the color vectors image. Same results in one felled swoop. Lerping hasn't really gone away, though. It is hidden in the implementation of image.
-sample rooster,300 \
+orientation. \
+fill. 'cross(I,[0.935,0.235,0.265])' \
-norm. \
-normalize. 0,1 \
+fill. '1/norm([1,1,1])' \
-to_rgb. \
-image... [-1],0,0,0,0,1,[-2] \
-rm[-2,-1] \
+norm[0] \
-mul[-2,-1] \
-output. rooster_keyred_2.png
Command reference
$ gmic -h norm
norm:
Shortcut for command 'norm2'.
norm2:
Compute the pointwise L2-norm (euclidean norm) of vector-valued pixels in selected images.
Example:
[#1] image.jpg +norm
Tutorial: https://gmic.eu/tutorial/norm2
norm:
Shortcut for command 'norm2'.
norm2:
Compute the pointwise L2-norm (euclidean norm) of vector-valued pixels in selected images.
Example:
[#1] image.jpg +norm
Tutorial: https://gmic.eu/tutorial/norm2


 Home
Home Download
 News
News Mastodon
 Bluesky
 X
X Summary - 17 Years
 Summary - 16 Years
 Summary - 15 Years
 Summary - 13 Years
 Summary - 11 Years
 Summary - 10 Years
 Resources
 Technical Reference
 Scripting Tutorial
 Video Tutorials
 Wiki Pages
 Image Gallery
 Color Presets
 Using libgmic
 G'MIC Online
 Community
 Discussion Forum (Pixls.us)
 GimpChat
 IRC
IRC Report Issue