 Home
Home Download
 News
News Mastodon
 Bluesky
 X
X Summary - 17 Years
 Summary - 16 Years
 Summary - 15 Years
 Summary - 13 Years
 Summary - 11 Years
 Summary - 10 Years
 Resources
 Technical Reference
 Scripting Tutorial
 Video Tutorials
 Wiki Pages
 Image Gallery
 Color Presets
 Using libgmic
 G'MIC Online
 Community
 Discussion Forum (Pixls.us)
 GimpChat
 IRC
IRC Report Issue
libgmic is a small, portable, thread-safe, multi-threaded, C++, image processing library that forms the foundation of the G'MIC framework. It is used by all available G'MIC interfaces. It is built upon the CImg Library, a lower-level C++ template image processing library which actually implements the core algorithms that G'MIC uses (a.k.a the native commands). Despite its small size (approx. 5 MB ), libgmic provides even more image processing operators than CImg, as well as a simpler API, so that anyone can readily integrate all the G'MIC features directly into their own code.
Here is a quick step-by-step guide to show how such an integration could be achieved. It assumes you are using Linux, but of course, the steps are very similar for other operating systems.
Step 1: Get the required library files
To be able to use libgmic in your own code, you need:- The header file gmic.h which contains the declarations of the classes and methods allowing to use the libgmic library. This file needs to be included by your source code.
- The dynamic library file libgmic.so (or its static version libgmic.a) that needs to be linked against your code. These binary files are of course platform-dependent. It is recommended you compile them directly from the latest source (following these instructions). Alternatively, you may have the libgmic files already present on your system (in /usr/lib/), if you have installed G'MIC from the .deb packages we provide.
Step 2: Write and compile your first code using libgmic
Now, you should be able to write your first libgmic-based program foo.cpp:
        //----- File 'foo.cpp' -----
        #include "gmic.h"
        #include <cstdio>

        int main() {
        try {
        gmic("testimage2d 512 output gmic_test.png");
        } catch (gmic_exception& e) { // In case something went wrong:
        std::fprintf(stderr,"ERROR : %s\n",e.what());
        return -1;
        }
        return 0;
        }
You can compile it simply like this (here, with g++):
$ g++ -o foo foo.cpp -lgmic
Execute it:
$ ./foo
and if all goes well, you should have a new image file gmic_test.png in your current folder, which looks like this:

Additional information:
- G'MIC is actually more than an image processing library. It defines an entire framework with its own scripting language. So, of course, libgmic embeds the corresponding script interpreter in addition to the image processing algorithms themselves.
- Actually, all libgmic entry points invoke the G'MIC interpreter, and all actions you want libgmic to perform will be described as pieces of small G'MIC scripts. That is exactly what we&apo;ve done in the file foo.cpp.
- By the way, it is then recommended to have some knowledge about how the G'MIC script language works, to be able to use libgmic as its full potential. Fortunately, this is a pretty straightforward language, and you can read very detailed tutorial pages which explain it, so this should not be a big deal.
- In the sample file foo.cpp above, we have just asked G'MIC to generate a new 512x512 color image
from scratch (with command testimage2d 512)
and save it as the image file gmic_test.png in the current folder
(with -output gmic_test.png).
Step 3: Dealing with image buffers
It is quite unlikely you want to manage the input/output of your image data to/from libgmic using files only. So here are details on how to pass image data using memory buffers instead. The important things to know are:- G'MIC does all its processing using float-valued image buffers. So you need to feed libgmic with such buffers when you invoke it. This may imply converting your current image data into buffers of 32bits float's before any libgmic call.
- G'MIC may take several images as input, and may output several images as well. So, it primarily works with list of images. All libgmic entry points which take image buffers will actually take a list of images as an argument. The execution of a G'MIC pipeline through the libgmic API modifies this list of images so that it contains the desired pipeline output.
- libgmic defines two simple classes gmic_image<float> and gmic_list<float> to create and manage float-valued images and lists of images. They have basic constructors/destructors for the allocation and deallocation of the corresponding float-valued memory buffers. So, you'll probably never have to do the memory allocation/deallocation by yourself.
- To summarize, the only thing you need to do is: 1. construct an instance of a gmic_list<float> containing N (initially empty) images, then 2. assign a size for each input image of the list, 3. fill the input image buffers (i.e. set the float values defining each image pixel), and finally 4. invoke one of the gmic() constructor (i.e. one of the libgmic entry points) to apply a G'MIC pipeline on the input images.
- When libgmic has returned, your input image list gmic_list<float> has been modified regarding the invoked processing pipeline. It may now contain more or fewer images, with different sizes, etc. G'MIC manages the necessary memory allocation/deallocation automatically to avoid memory leaks.
        //----- File 'foo2.cpp' -----
        #include "gmic.h"
        #include <cstdio>
        #include <cmath>

        int main() {
        gmic_list<float> image_list;
        image_list.assign(2); // Tell 'image_list' it has 2 images.

        for (unsigned int i = 0; i<image_list._width; ++i) { // 2 input images.

        // Initialize each image of 'image_list' to a 320x200x1x3 (color) image.
        gmic_image<float>& img = image_list[i];
        img.assign(320,200,1,3);

        // Fill image buffer with random sinus waves.
        float *ptr = img;
        for (unsigned int c = 0; c<img._spectrum; ++c) // 3 channels.
        for (unsigned int y = 0; y<img._height; ++y) // 200 rows.
        for (unsigned int x = 0; x<img._width; ++x) // 320 columns.
        *(ptr++) = (float)(128 + 127*std::cos(x/(5. + 10*i))*std::sin(y/(5. + 10*i + c)));
        }

        gmic_list<char> image_names; // We don't care about image names here, let this empty.
        try {
        gmic("water[0] 20 flower[1] 20 blend vividlight",
        image_list,image_names);
        } catch (gmic_exception &e) { // In case something went wrong.
        std::fprintf(stderr,"ERROR : %s\n",e.what());
        return -1;
        }

        // Here, 'image_list' now contains only 1 (color) image of size 320x200x1x3.
        // You can retrieve the image data from the buffer at 'image_list[0]._data',
        // as well as the image dimensions 'image_list[0]._xxxx', where
        // 'xxxx' can be 'width', 'height', 'depth' or 'spectrum'.

        (...)  // Do whatever you want with the image data here.

        image_list.assign(0); // Deallocate images, if you want to do it before the destructor.
        return 0;
        }
In foo2.cpp, we first define and initialize a list of two input images (with random sinus waves for the colors). They actually look like this:
 |
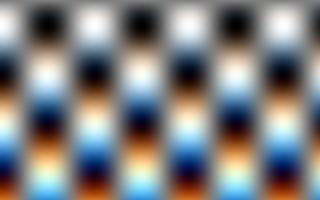 |
At this stage, you already know the most complex things about the use of the libgmic API :).
Step 4: Additional information about the libgmic API
In bulk order, some other interesting things to know about the libgmic API:- A gmic_image<float> instance as defined in G'MIC has 4 dimensions:
width (number of columns), height (number of rows),
depth (number of slices) and spectrum (number of channels).
There are no hard limits for each image dimension, except the available memory required to store the image buffer.
You can set an arbitrary number of channels for an image (more than 4 for instance), or an arbitrary number of slices (to deal with 3D volumetric images).
A usual RGB color image has three channels (spectrum==3) and a single slice (depth==1).
That's why we define our color images with dimensions '320,200,1,3' in
the file foo2.cpp.
The encoding order of the pixel values in an image buffer is straightforward and follows the natural order of the image dimensions: It first stores the image variations along the
X-axis (columns), then Y (rows), then Z (slices), then finally C (channels). For instance, the memory buffer for a 2x2x1x3 RGB color image
is organized as follows (beware, the channels are not stored in an interleaved way!):
R(0,0),R(1,0),R(0,1),R(1,1),G(0,0),G(1,0),G(0,1),G(1,1),B(0,0),B(1,0),B(0,1),B(1,1)
- The call to gmic(...) is actually a call to a constructor. It constructs one temporary gmic instance
and destroys it just after it has completed its pipeline execution. It is possible to construct a more permanent gmic instance, and use it multiple times if necessary.
For instance, the call to libgmic in file foo2.cpp could have been decomposed like this:
            gmic g_instance;
            g_instance.run("water[0] 20",image_list,image_names);
            g_instance.run("flower[1] 20",image_list,image_names);
            g_instance.run("blend vividlight",image_list,image_names);
            g_instance.run("output gmic_test.png",image_list,image_names);
- You may want to set names for your input images. For instance, in file foo2.cpp, we could have set the input image names like this:
            const char *const name1 = "First image", *const name2 = "Second image";
            gmic_list<char> image_names;
            image_names.assign(2);
            image_names[0].assign(std::strlen(name1)+1); // We don't forget the '\0'.
            std::strcpy(image_names[0],name1);
            image_names[1].assign(std::strlen(name2)+1); // We don't forget the '\0'.
            std::strcpy(image_names[1],name2);
And similarly, you can get the name of the resulting image by:
const char *const output_name = image_names[0];
Setting image names is generally useless, except if one of the commands you invoke in your G'MIC pipeline takes care about it (there are some). - If by chance, you are already a user of the CImg Library,
you might be happy to learn that the two main libgmic classes
gmic_image<float> and
gmic_list<float> are actually the same as the CImg classes
CImg<float> and
CImgList<float> respectively.
Indeed, the G'MIC project is based on CImg, and it is then straightforward
to use CImg in conjunction with libgmic, and get the power of both libraries at the same time.
The file foo3.cpp below illustrates the mixed use of CImg and libgmic:
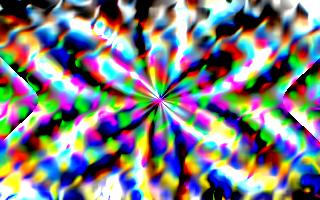
            //----- File 'foo3.cpp' -----
            #include "CImg.h"
            #include "gmic.h"
            using namespace cimg_library;

            int main() {

            // Load input image files, using the CImg Library.
            CImg<float>
            img1("img/lena.jpg"),
            img2("img/joconde.jpg");

            // Move input images into a list.
            CImgList<float> image_list;
            img1.move_to(image_list);
            img2.move_to(image_list);

            // Define the corresponding image names.
            CImgList<char> image_names;
            CImg<char>::string("First image").move_to(image_names);
            CImg<char>::string("Second image").move_to(image_names);

            // Invoke libgmic to execute a G'MIC pipeline.
            gmic("water[0] 15 wave[1] 15 "
            "320,256 mandelbrot. -0.6918,-0.4831,-0.6375,-0.4338,256 "
            "64,1,1,3,?(255) r. 256,1,1,3,3 point. 0 map.. . rm. "
            "frame 2,2,0 to_rgba drop_shadow 3,3 montage X "
            "i[0] 100%,100%,1,3,255 blend alpha "
            "name \"Result image\"",
            image_list,image_names);

            // Display resulting image.
            const char *const title_bar = image_names[0];
            image_list.display(title_bar);

            return 0;
            }
Here, we start to load two input images lena.jpg and joconde.jpg in memory, and after the libgmic invocation, we get this single resulting image:Implementing the same pipeline entirely with CImg calls only would have involved much efforts for sure!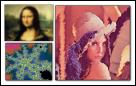

In the G'MIC source, you will a sample file use_libgmic.cpp which contains all the stuffs we've summarized in this page. Check it out and compile it to have another example on how the libgmic can do for you.